Plans
Cheap Hardware Murphy Bed (QUEEN)
$7.99
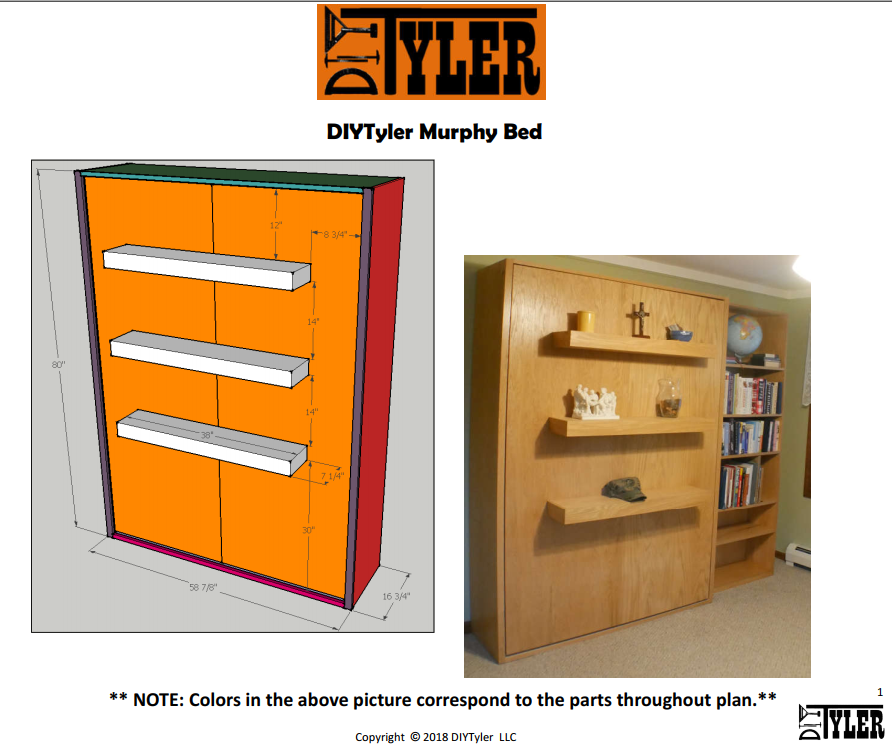
18 Pages of basic, full color, plans for the DIYTyler QUEEN SIZE MATTRESS Murphy Bed. This is a Digital download in PDF format.
These plans are non-refundable. After checkout you will be given a link to download and you will receive an email with a receipt and another link in case you missed it.
Queen is 65 7/8″ wide, 84″ off the wall down, 16 3/4″ off the wall up, 84″ tall.
Lumber Needed:
5) Sheets of 3/4″ Plywood for the bed.
1) 2x6x8
2) $10 Swivel Brackets
Various screws, nuts and bolts.
Additional sheets necessary for options.
Changelog:
You will receive all variations of the bed plans, use the latest version for your build.
v1.1 Updated swivel bracket link to available bracket. Hardware added.


Kelly –
Great stuff. Should their be concern for the load baring weight on the brackets. I know they’re rated close to 300lbs, but that’s not considering the angle at which we are using them and the extra bed and wood weight.
Daniel Yaw –
i have just purchased the plan. looks great and i can’t wait to get on to it. However, i made a mistake when i clicked on the selcetion. I meant to purchase the queen size instead of the full size. is there anyway i could get the copy of the queen size instead?
thanks
Daniel –
Your plan design works excellently well. I have built it and am very happy with it. Thanks. You were very kind too as i accidentally hit the wrong choice of the full bed instead of the queen size and you sent me the correct one. Thanks again. I do have one little question though. If i would like to install a gas piston to it as well, how do i do it? Thanks again
DIYTyler –
Have never installed a gas piston so I am unable to help. I would be worried it would even fit in this design.
Michelle Crandall (verified owner) –
Thank you for your wonderful plans my husband and I dit this in two weekends. We had to adjust so the bed could come down sideways instead of lengthwise. We wove it.
Steven Mohns –
Any plans for a king size mattress? I am looking for that at this time.
DIYTyler –
No King size at this time.
Sandra dove –
Before I purchase the plans is the queen size smaller than the full size Sorry I’m in the uk
DIYTyler –
Queen is bigger than a full.
CM –
Loving your website and youtube account.
Will be ordering Queen Sized Murphy Bed Plans.
What is that rotating piece of hardware called?
I might also try horizontal twin bunks… I’ll see 🙂
Dare (verified owner) –
Hi,
Thank you for the plan, could you tell me the length of the hex bolt you used? i think using a 1/4 – 20 X 1 1/2 may be too long
Bob Lehnig –
I am going to buy your plan, However I have one question.
Are all 3 shelfs/legs required for strength/support or would I be able you get by with just the top one?
steven chasse (verified owner) –
Nice Set of plan, i got the Queen sets and was wondering if this bed frame would fit a 10in deep matress
thank
moe (verified owner) –
Hello Tyler bought your queen size bed pattern hope it work.s. Love your projects ….. Wish me luck. lol
moe (verified owner) –
Hello Tyler would like know what size bolts did you use… Thanks
Justin Yert (verified owner) –
Did you make the video for the optional shelves? I am trying to modify them to be more of a night stand height but I think my measurements are coming out wrong.
Lena –
I purchased the full size plan but need the queen. Is it possible to switch plans or can you send me measurements for the queen size? Thanks.
DIYTyler –
Will send you an email!
Bryan –
I’ve got a floor to ceiling height of 96” and I’m worried it would be a bit tight for my queen. Could you modify the plans to make a horizontal murphy bed design out of this? And would it be possible after I’m finished to add shelving on top?
DIYTyler –
Our bed is in a room with 89 1/2″ ceiling so you should be good!
Angie –
I’m hoping my husband will build this for our guest room, and I am wondering if you could give an estimate of what the entire project would cost, including all the wood and hardware? A ball park figure?
DIYTyler –
Somewhere around $300. Biggest cost is the plywood, at least $250 right out of the gate.
Himanshu –
I live in a very small place and I just have access to a Jigsaw.
How difficult is it to get the wood cut from somewhere like home depot and assemble it.
What equipment will I require at a minimum?
Jim –
How thick of a mattress does your queen plans account for?
DIYTyler –
You can get a 12.5″ mattress in without squishing it at all.
Tish –
How long did this take you to complete? I’ll have to hire someone and will need to factor labor into my estimate. And what are the external dimensions for the queen when finished, want to measure the space first. Will purchase the plans once I verify it’ll fit and find a carpenter.
Thanks, this looks fabulous and just what I was looking for!
Michael Casuccio (verified owner) –
I bought the plans for the queen size bed and we just finished making it.
Spent right around $350 USD for the whole project (includes wood, hardware, paint and misc stuff.)
Note: As someone mentioned in the comments for the full size plans, there are some details missing from the plans. However, the some of those details were mentioned in the video and others we were able to figure out. We have experience with wood working projects so overall the detailed drawings were a big help.
The parts list was missing some things:
> Screws and nuts for the swivel brackets. We used 1/4-20 machine screws 1 inch long with lock nuts (available at Lowes and probably Amazon)
> Trim pieces cut were not on the plans but were mentioned quickly in the video and the dimensions of needed can be determined from the drawings. I purchased 1″ x 2″ (3/4″x 1-1/2″) stock boards from Lowes (2 each 8 ft long, 3 ea 6 ft long) for the trim. No ripping necessary. Just cut to size.
Other notes:
> Pocket screw locations and quantity are not shown. Locations don’t have to be precise. You can get an idea by watching the video. I tried to place them about every 12 inches on the long stretches and on the ends of boards at least 2 or as many that would fit about 3-4 inches apart.
> We did have a baseboard in the way so I opted to remove that section of baseboard so the cabinet would be flush with the wall. Other options would be to place the cross that goes across the back bottom up a few inches, then either notch the baseboard to accommodate the 3/4″ sides or notch the back of the side pieces to accommodate the backboard.
> I opted to do the assembly and finish work in the bedroom as the assembled pieces would have been too big to navigate the doorways and hall between my garage and the bedroom.
> Since we were going to paint the whole thing rather than stain it, I purchase blonde wood plywood instead of oak. It was a few dollars cheaper per board and had a nice smooth finish that required almost no sanding. I opted not to use the Edge Banding as the paint covered the edges.
MAJOR NOTE: The finished queen size bed is extremely heavy. It takes 2 of us to raise and lower it. We can manage that but it may be a safety concern for some folks. I do wonder if the swivel brackets will hold up long term supporting all that weight.
Overall the plans were a great starting point and with our experience we were able to work through it to the finished product. I especially loved the pattern layouts that showed how to cut each piece of plywood. That was a huge time saver. The 3D plans with dimensions made it easy to visualize the assembly. It took 2 people about 4 days worth of work to do it all but we don’t have a nice workshop like Tyler’s. I enjoyed the project and got a great piece of functional furniture for a low price. However, when asked if I was going to make a second bed for another room, I said I might seriously consider spending the money on a pre-made bed.
Joey (verified owner) –
Hi Tyler,
I just purchased your plans and wondered if you have any suggestions about reducing the weight of the bed frame without compromising rigidity. The plywood certainly adds a lot of weight and I wondered if using a thinner plywood as the front fascia would be acceptable.
Thanks!
Shonna Johnson –
Before I purchase, can the plan be modified to a horizontal queen? and Can I just use the top shelf for support
Jay K. –
To offset these trolls I’m giving you a 5 Star rating for your time, effort, video tutorial, and your detailed plans. As an amateur wood worker I understand that plans and tutorials make all the difference in the world. $50 would be well worth it!
Why these trolls would give you anything less than 5 is beyond me, just because you don’t have custom plans for just for them.
Great job man!
Thank you!
chris Banick –
HI Tyler,
I really like your video and the only thing I am wondering about is whether a queen size will fit in my basement apt. It is 86″ high.
Thanks for the information.
James Morris (verified owner) –
Hi Tyler, I purchased the plans for the Queen size. Is there a narrative that goes with the pictures?
Chris Lancaster –
Hi Tyler,
I purchased the plans for the Queen size murphy bed and I can’t wait to get started. Since there will be a desk in front of our bed when it’s folded up, I won’t be using the bottom floating shelf. Without that shelf, I’m envisioning more weight on the swivels and side panels. Do you think it would help to double up on the cabinet side boards to reduce any side to side wobbling when someone is turning over? Or is the 3/4″ plywood plenty solid without that?
Thanks!
Melissa (verified owner) –
Does the bed rest on the floating shelves when the bed is open?
DIYTyler –
Yes, is really the hole point of the shelves.
Danielle –
Hi, do you have any suggestions for adding a sofa under the bed in place of shelves?
Elena –
Want to purchase the pond for queen but have a couple questions. What is the weight of the fold down part? I’m worried it will be too difficult for one person to fold down and/or wear on the swivels quickly. Also how do you get the mattress to stay in the base when you fold up? Wouldn’t it fall out?
DIYTyler –
The fold down section is heavy but not too bad. Mattress tips back into the wall but sets back onto the frame as soon as you start to move it.
John Grieve (verified owner) –
What are the widths of the solid oak boards? And is the 1/4 reveal on both sides of the sides.
Rolf (verified owner) –
I got the plans, I have the matress, it is ~16 high. How wide/deep do I need to make the case? It looks like the headboard is set to 1-1/2″ + 3/4″ out from the wall, then the 3/4″ frames under the matress, then 3/4″ base. Your sides are 16″, so I should add about 3-3/4″ to the 16″ you have (1-1/2+3/4+3/4+3/4).
Am I doing this math right?
Is there a sketchup file for this I could edit to get a new cut list?
DIYTyler –
Rolf,
Your math looks correct, the frame as is can hold a 13-13.5″ mattress.
If you send me an email DIYTyler@gmail.com I can send you the sketchup file, for your eyes only.
TylerG
Chris (verified owner) –
I feel like the plans could have been more detailed and a bit clearer in some sections, however they are well enough that with some reasoning they can be figured out, will be using some of the comments here along with the plans to hopefully get this built this weekend.
Cary –
Great Idea. I’m gonna use the boat seat swivel idea on the fold down I’m gonna build for my screened in porch. Might even try a 1” to 1 1/2” spacer (or however much is necessary) between the cabinet and side rail to allow for some air shocks. That way I can add them if I have to. Many thanx you just saved me about $170.00 😉
Cody Kelly –
Hey Tyler, any suggestions how to use this exact build, but make the Murphy Bed horizontal so it folds sideways?
Thanks!!
Cody
Lance –
Hey Tyler – I’d like to use an 8″ thick mattress, would these plans work for that? If not, could you modify them and what would be the cost? Thanks! Lance
DIYTyler –
Lance, the bed will accommodate a 13″ thick mattress.
Lyle –
Hi Tyler, I just purchased your murphy bed plans but wanted queen size and clicked on full size instead. Can you give me the dimensions for the queen size plan.
Greg –
Hey Tyler, love the DIY plan. I want to install a Queen on a basement wall with 7′ ceilings. Will the plans be the same (applicable) for the horizontal wall bed? Hoping to just rotate your plans by 90 degrees. Sounds too easy though. And do you know if the horizontal bed lift will it be harder or easier than vertical with one person? Thank you.
Mark Wasakoski (verified owner) –
Hi Everyone.
I bought and have built the Queen size plans. Unfortunately, I’m having trouble with clearance between the bottom of the cabinet and the bed frame. My cabinet hinges are 3/4 from the front (without trim) and 8 up from the bottom (as I believe indicated in the plans). The bed frame swivel placement is 3/4 from the bottom and 6 1/2 from the end (after assembly). I have a 1-inch high piece of solid oak spanning the front bottom of the cabinet. When I try to close the bed frame into the cabinet, the bed frame is stopped by the 1-inch high piece of oak spanning the front of the cabinet.
Any advice?
Mike –
Like the plans.how would I adjust for a twin size mattress? Are there plans for a twin?
DIYTyler –
Mike, No plans for a twin, you would have to look at the different mattress dimensions and adjust accordingly.
Rev –
Do you have plans for Queen horizontal idont have the hight for regular one
Prometheus (verified owner) –
Bought the plans as a beginner with minimal experience and no workshop to speak of. Did most of the cutting in my kitchen (bad idea) and had to do it all in chunks because of lack of time. Overall, took me about a month to build once I bought the materials. I opted out of the trim as it wasn’t actually listed as a material or within the cut diagrams. But my bed is functional. Had to modify a few thing to make it work in my space (ie. putting one of the locking pins on top rather on the side, and cutting out a chunk of the side of the frame to give access to a light switch) but it was well worth the cost of the plans.
DIYTyler –
Good to hear! The trim is not necessary for structure so you are all set. Glad it worked out!
Lenaluv87 –
This may seem like a weird question, but how high is the bed off the floor when it’s down? I want to try to do a Murphy bed couch combo and need it to be at least a foot off the floor. If I have to raise it would you recommend building a base for it or just raising the swivel location?
Sean –
Where can you purchase the swivel bracket.
William –
I’m curious what size swivel brackets these plans use? I currently have a set and not sure if I would need to order new ones or if the ones I have are the correct size.
Jimmy Green –
Great plans and bed looks great but had to convert every measurement to metric and adapt a few to fit for 18mm ply. With the swivels moved back the bed base is not flush with the trim when raised but not really that different just trimmed with 6mm wood and it was fine. Nice 3 day project and cost about £260 in total.
Betsy Groves –
Do you have a king size version of this plan? if not I’ll try to modify from the queen size set
DIYTyler –
Unfortunately we don’t have a king size. Sorry!
Brendan Dziama (verified owner) –
Haven’t started yet… 5* is hopefully optimistic! Question… how much flex. room do we have with the leg, shelf options. Can we explore more aesthetic placement and design that still satisfies the weight balancing? What about adding a simple folding desk at the bottom? Thanks!
Peter Stevens –
looke excellent